Fascia Board Replacement: Average Costs + Process
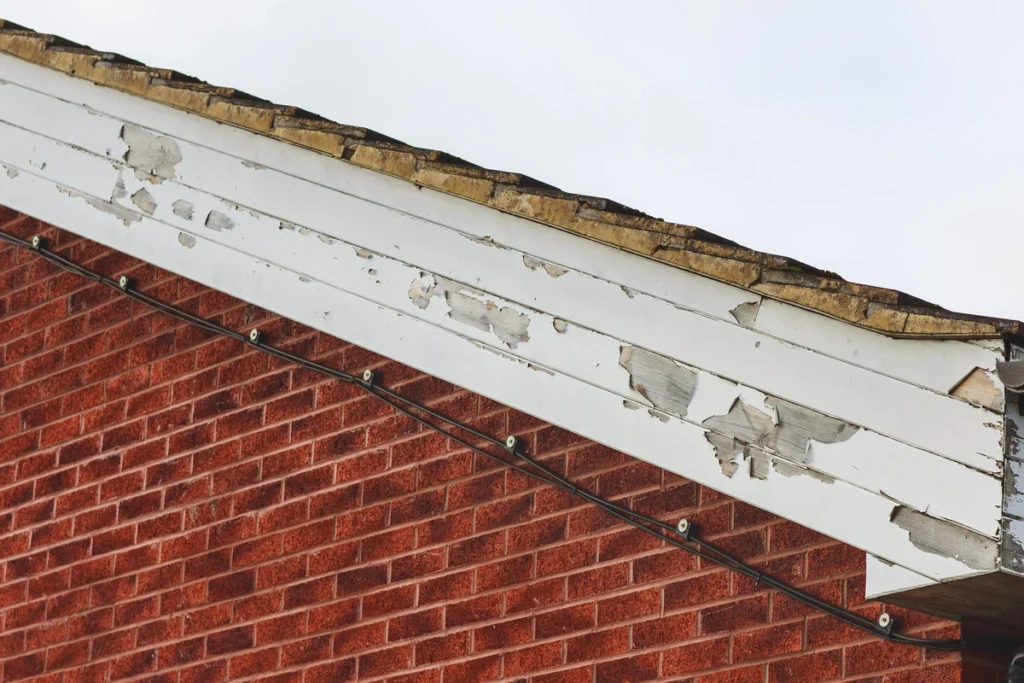
Your home’s fascia board might not be the first thing you notice, but it plays a crucial role in protecting your roof and maintaining your home’s overall structural integrity. Over time, fascia boards can become damaged by moisture, pests, or general wear and tear. When that happens, it’s essential to replace them promptly.
In this comprehensive guide, we’ll walk you through the average costs of fascia board replacement and provide a step-by-step tutorial for a successful DIY project.
What’s inside this read:
- The importance of replacing your fascia board
- 9 steps for replacing your fascia board in DIY fashion
- Tips + tricks for a successful board replacement project
🤔 Why Replace Your Fascia Board?
Before diving into the replacement process, let’s understand why replacing your fascia board is necessary:
- Protecting Your Roof: Fascia boards help support the lower edge of your roof and protect it from moisture and weather damage.
- Preventing Pest Infestation: Damaged fascia boards can become a haven for pests like termites and carpenter ants. Replacing them can prevent infestations.
- Enhancing Curb Appeal: New fascia boards can improve the appearance of your home, adding to its overall aesthetic appeal.
💵 Average Costs of Fascia Board Replacement
Fascia board replacement costs can vary depending on factors like the material used, the extent of damage, and whether you hire professionals or choose to do it yourself. Here’s a rough breakdown of potential costs:
- Materials: The cost of materials, such as fascia boards, paint or sealant, nails or screws, and any required tools, typically ranges from $200 to $600, depending on the size and material chosen.
- Labor: Hiring a professional contractor can add significantly to the cost, with labor charges ranging from $300 to $900 or more, depending on the complexity of the job.
- Total Cost: On average, homeowners can expect to pay between $500 and $1,500 for fascia board replacement, with variations based on location and specific project requirements.
Now, let’s get into the step-by-step process of replacing your fascia board.
✅ 9 Steps to Replacing Your Fascia Board

Below, we’ll go over the 9 essential steps for an effective fascia board replacement, so you can achieve it at home like a true pro.
1. Gather Your Tools and Materials
Before starting the replacement process, ensure you have all the necessary tools and materials ready. You’ll need a new fascia board, which should be measured and purchased to the correct length. You’ll also require a pry bar or crowbar, a hammer or screwdriver, and a saw—this could be a circular saw, reciprocating saw, or hand saw depending on your preference. Additionally, have a measuring tape for precise measurements and a carpenter’s square to make clean, accurate cuts. For securing the board, you’ll need nails or screws that are resistant to weather and corrosion. Caulk or sealant is essential for sealing seams and joints, and if you plan to paint the fascia board, have paint and a paintbrush ready.
2. Ensure Your Safety
Safety is the most important part of any home improvement project. Make sure your ladder is stable and secure before climbing, and it’s highly recommended to have someone spotting you if you’ll be working at heights. Wear appropriate safety gear, such as gloves and safety glasses, to protect your hands and eyes while handling tools and materials.
3. Remove the Old Fascia Board
The first step in replacing your fascia board is to remove the old one. Start at one end of the fascia board and use a pry bar or crowbar to carefully lift it away from the structure. Work your way along the entire length of the board, being cautious not to damage any adjacent materials like the soffit or siding. This step requires patience to ensure that the surrounding areas remain intact.
4. Measure and Cut the New Fascia Board
Once the old fascia board is removed, measure the length needed for the replacement. Use a measuring tape to take accurate measurements, and mark the dimensions clearly on the new board. To achieve precise cuts, use a carpenter’s square to guide your saw. Depending on your preference or the space available, cut the new board using a circular saw, reciprocating saw, or hand saw. Double-check your measurements to ensure the board will fit perfectly.
5. Attach the New Fascia Board
With the new fascia board ready, position it carefully along the roofline. Align it with the existing fascia boards, ensuring it sits snugly in place. Secure the new board with nails or screws, making sure to use fasteners that are designed to withstand weather conditions and resist corrosion. Take your time to ensure the board is firmly attached and properly aligned for a clean finish.
6. Seal the Seams and Joints
To protect your roof and fascia board from moisture infiltration, apply caulk or sealant to all seams and joints where the new board meets existing ones. Use a high-quality exterior caulk or sealant that matches the material of your fascia board. Apply a bead of caulk along the seams, then smooth it out with either a caulk gun or your finger to ensure a watertight seal. This step is crucial for preventing water damage and increasing the lifespan of your work.
7. Paint or Seal the Fascia Board (Optional)
If you want to improve the appearance and durability of your fascia board, consider painting or sealing it. Choose a paint or sealant that is designed for outdoor use and matches the color scheme of your home. Apply the paint or sealant evenly, following the instructions provided by the manufacturer. Depending on the product, you may need to apply multiple coats for complete and long-lasting coverage. Allow sufficient drying time between coats to achieve the best results.
8. Cleanup and Inspection
After completing the installation and any finishing touches, take the time to clean up your work area. Remove any debris, nails, or scraps to keep the space safe and tidy. Inspect the new fascia board and the surrounding areas to ensure everything is securely in place, properly sealed, and free of defects. This final check will give you peace of mind that the job has been done correctly.
9. Enjoy Your Improved Fascia Board and Home! 🏠
With the new fascia board in place, you can enjoy the benefits of improved roof protection and enhanced curb appeal. Knowing your home is well-maintained will give you peace of mind, whether you’re admiring it from the curb or protecting it from the elements. Your hard work has paid off, and your home is now better equipped to withstand the challenges of daily wear and tear.
💡 Tips for a Successful Fascia Board Replacement

Here are some additional tips to ensure a smooth and successful fascia board replacement:
- If you’re unsure about any part of the process when it comes to replacing fascia boards or installing a drip edge, consult with a professional contractor for guidance or consider hiring them for the job.
- Take safety precautions seriously. Use proper safety gear, work on a stable surface, and avoid working in adverse weather conditions.
- Regularly inspect your fascia boards, fascia materials, and drip edge to catch issues early and prevent extensive damage.
- Consider using a fascia cover for added protection and durability when replacing fascia boards.
🏠 A DIY Project for a Sturdy Home
Replacing your fascia board may seem like a daunting task, but with the right tools, materials, and a step-by-step guide, it’s a manageable DIY project that can improve your home’s appearance and structural integrity. Remember to prioritize safety, take your time, and enjoy the sense of accomplishment that comes with enhancing your home’s curb appeal and protection.
Get in touch with our pro team of window professionals at Arch Exteriors today to experience top-notch service and the highest quality craftsmanship. We customize exterior options to fit any budget!


